
Mixing / Low end / Rock & metal
Kick and Bass Mixing: One Cone, Two Instruments
The physics behind a low end that hits hard, stays readable and leaves room for the rest of the mix.
In this article
- 1. Two Tracks Become One Signal
- 2. A 50 Hz Experiment You Can Actually Understand
- 3. Polarity, Phase and Timing Are Different Controls
- 4. Why Lining Up the Waveforms Can Let You Down
- 5. Is It Cancellation, Masking or Dynamics?
- 6. Build the Bass Tone Around Its Job
- 7. Make Space Where the Collision Happens
- 8. Low End Costs Headroom and Excursion
- 9. A Repeatable Kick and Bass Mixing Check
- 10. Let the Whole Mix Decide
- Kick and Bass Mixing FAQ
- Sources and Further Reading
The kick sounds huge. The bass sounds huge. Bring them together and the punch disappears.
So you boost the kick. Then the bass. Now the mix bus is working harder, the guitars feel smaller, and the low end still refuses to settle.
Before reaching for another EQ, listen to what happens when those two tracks meet.
In your DAW, kick and bass have separate names, meters and plugin chains. At each output channel, their samples become part of one summed signal. A loudspeaker responds to that combined input through its own electrical, mechanical and acoustic behavior.
That is where better kick and bass mixing begins: with the relationship between the sounds. Their timing, sustain, pitch and harmonic content determine what the low end can do together.
Listen first. Watch the cone. Measure to understand.
1. Two Tracks Become One Signal
For a simple linear sum, the idea is straightforward:
s(t) = k(t) + b(t)
At each instant, the kick signal and bass signal add. Same-sign values reinforce one another. Opposite-sign values subtract. For two identical sine waves, changing their relative phase changes the amplitude of the result. Daniel Russell’s Penn State demonstration of wave superposition makes that relationship visible.
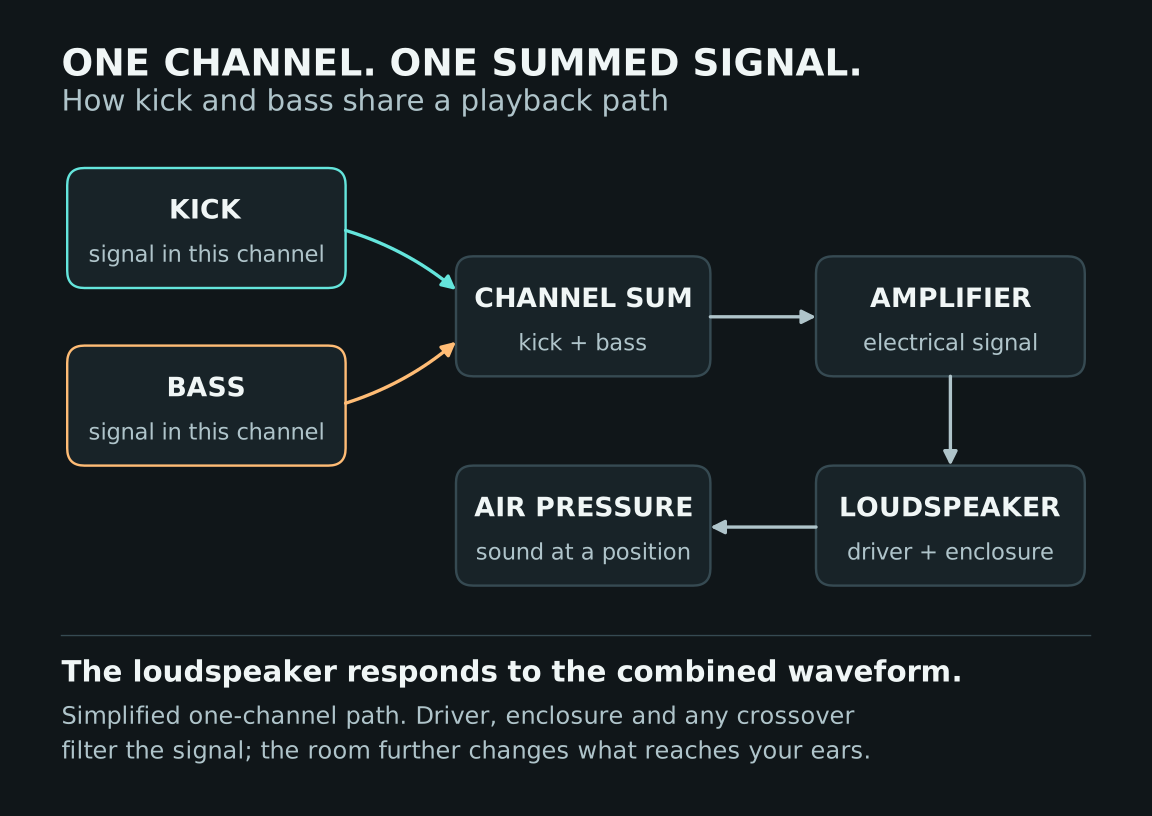
A simplified path for one output channel. The loudspeaker and enclosure shape how the electrical input becomes motion and sound. Open the image for a larger view.
The waveform in your DAW is not a literal drawing of cone position. Driver behavior, crossovers and the enclosure affect the conversion; the room then changes what reaches your ears. Loudspeaker measurement systems distinguish input voltage, displacement and radiated pressure for this reason. Klippel’s transducer measurements describe these as separate quantities.
Still, the practical point holds: every low-frequency layer contributes to the demand placed on the playback system.
2. A 50 Hz Experiment You Can Actually Understand
A 50 Hz sine wave completes one cycle in 20 milliseconds. Create two identical, phase-controllable sine signals and route both to the same mono bus. Start at a low monitoring level with generous digital headroom; continuous bass tones can demand substantial speaker movement.
Keep both source levels fixed. Change only their relative phase:
| Relative phase | Sum amplitude, relative to one sine | Level change versus one sine |
|---|---|---|
| 0° | 2.00× | +6.02 dB |
| 45° | 1.85× | +5.33 dB |
| 90° | 1.41× | +3.01 dB |
| 135° | 0.77× | −2.32 dB |
| 180° | 0 | Ideal cancellation |
These values follow from A_sum = 2A × |cos(φ/2)| for equal-amplitude, equal-frequency sine waves. They describe the mathematical signal sum, before clipping or other nonlinear processing.
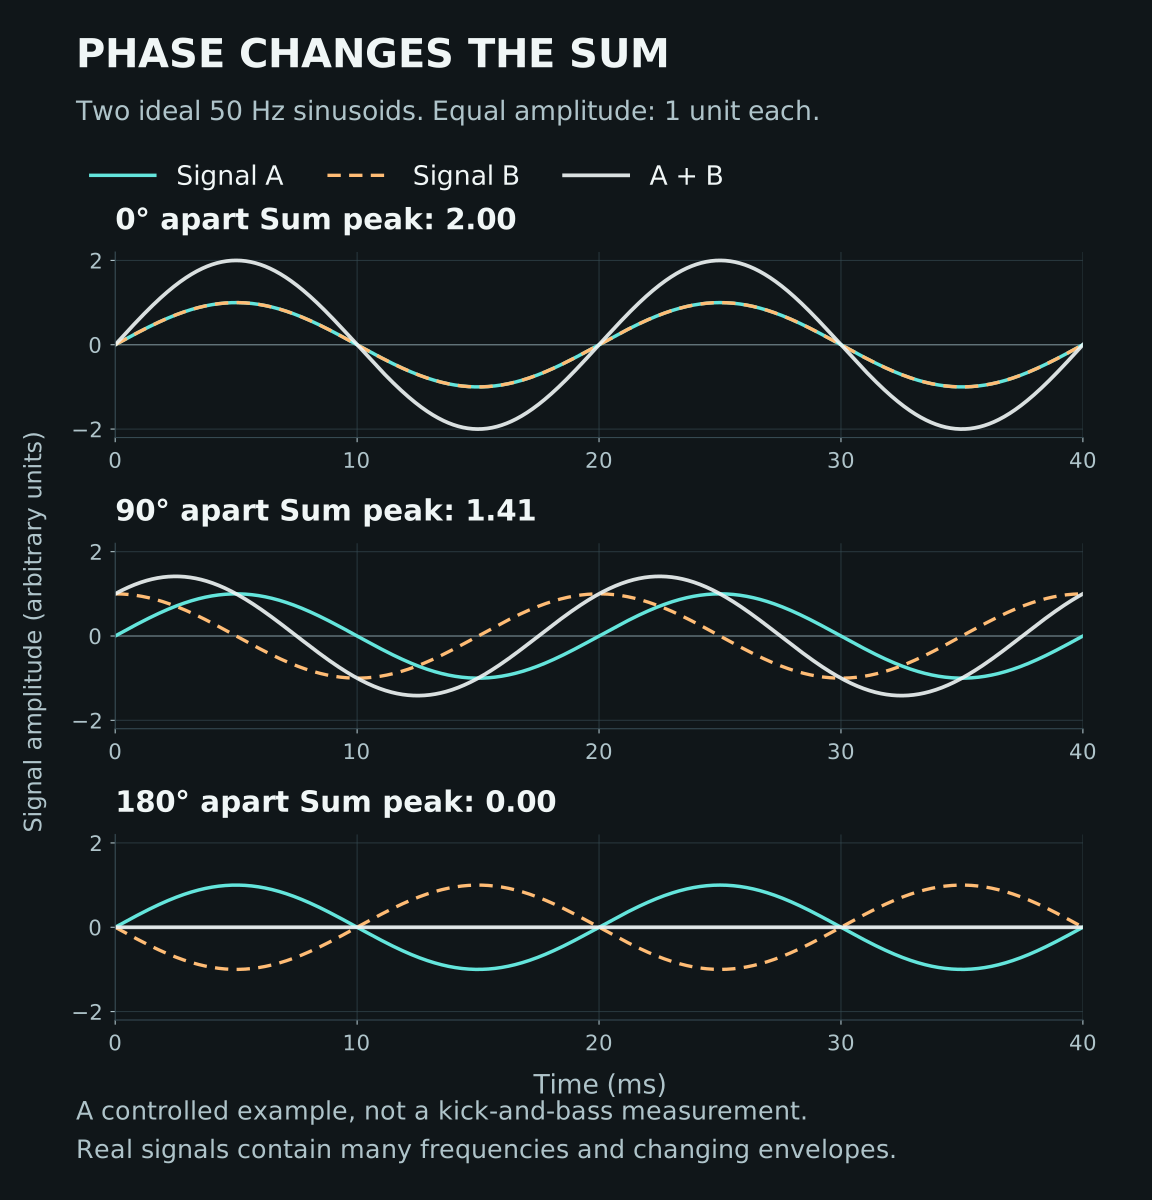
Ideal sine waves, calculated on the same amplitude scale. These are illustrations, not measurements from an Aurora DSP listening test. Open the image for a larger view.
Watch the bus meter and oscilloscope. If the woofer is visible, its movement can help connect the experiment to something physical. A phone camera may show misleading motion because of frame rate and shutter effects; use it as an illustration, not an excursion or SPL meter.
Run this through one shared signal path. Two speakers playing separate tones introduce room position and acoustic path differences into the experiment.
Then replace the sine waves with music. The tidy result immediately becomes more complicated.
3. Polarity, Phase and Timing Are Different Controls
Polarity inversion changes x(t) into −x(t). Every sample changes sign. Nothing moves in time.
A time delay moves the entire signal. For a sinusoidal component, the magnitude of the resulting phase shift is:
φ = 360° × f × Δt
Here, frequency is in hertz and delay is in seconds. A 5 ms delay corresponds to 90° at 50 Hz and 180° at 100 Hz. The same edit affects different frequencies differently.
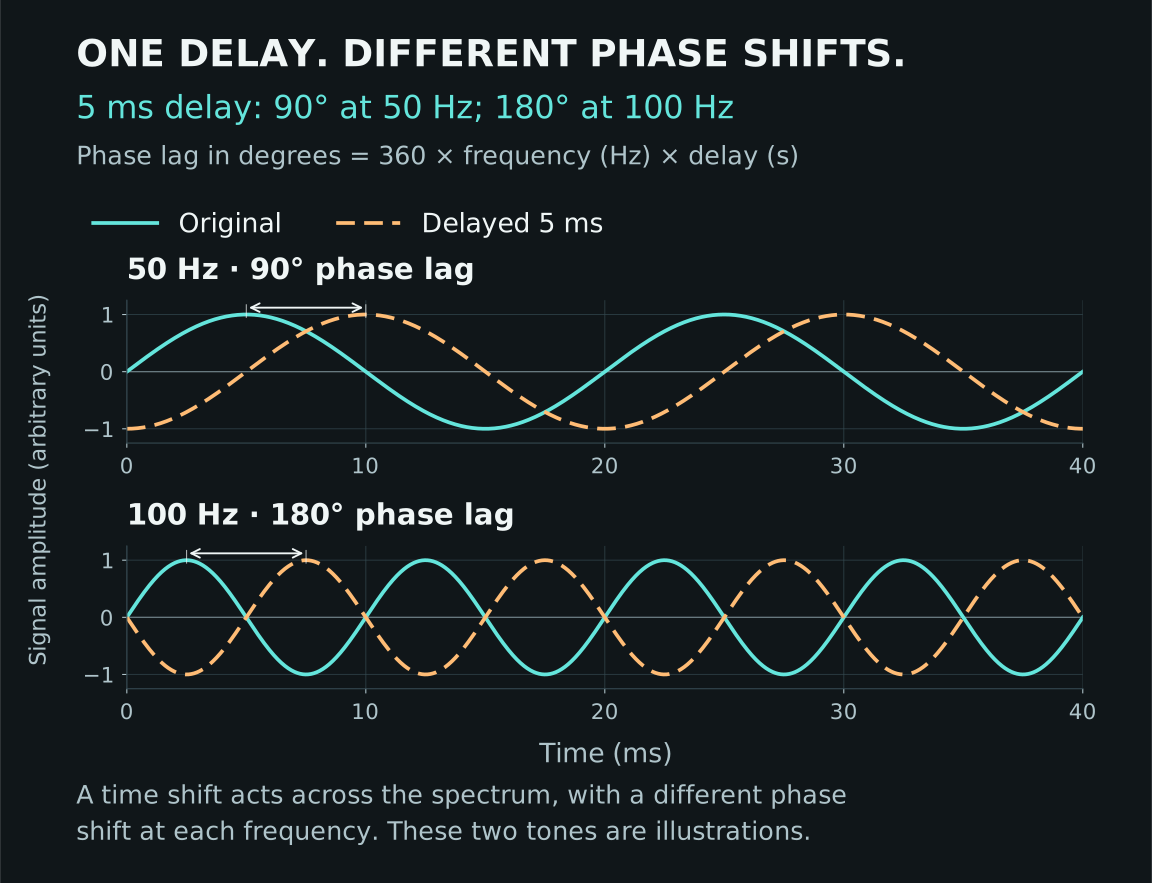
A fixed delay creates a frequency-dependent phase shift. Moving one track cannot independently align every component of a complex sound. Open the image for a larger view.
For one pure sine, a half-cycle delay and polarity inversion produce the same steady-state waveform. A kick drum contains a transient, changing low-frequency content and a decay. A bass part contains changing notes and harmonics. That equivalence does not extend to the complete musical signals.
Start by checking alignment between related recordings of the same source: bass DI and miked amp, multiple kick microphones, or parallel bass paths. Then evaluate kick against bass as a musical relationship. A global nudge of the bass also changes the groove.
4. Why Lining Up the Waveforms Can Let You Down
One kick hit may land against the start of a bass note. The next may arrive halfway through its sustain. A different note changes the period of the bass waveform again.
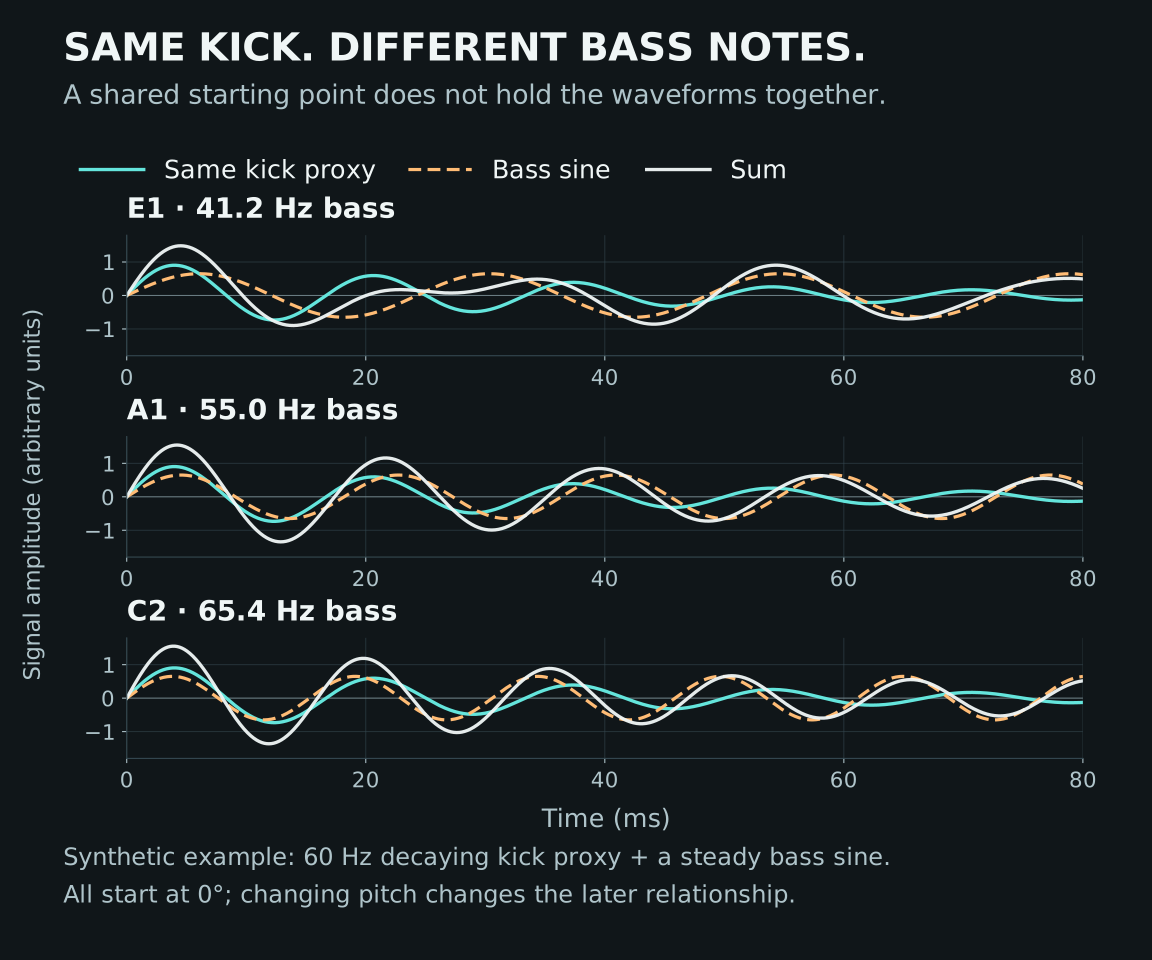
The same kick meets a different bass cycle when the note changes. Synthetic signals illustrate the timing relationship; they are not recordings or recommended alignment settings. Open the image for a larger view.
John Stuart Murray’s University of York research on kick and bass modelling treats these sounds as non-stationary: their properties evolve over time. That is a useful reminder when a screenshot seems to offer one perfect alignment.
Try polarity inversion as a quick comparison, then listen across several notes and sections. If one hit becomes larger but the next loses definition, the change has exposed a variable relationship rather than solved it.
Phase can also affect perceived bass level in harmonic signals, as reported in Aalto University research. That finding does not establish a universally best phase setting for a song.
Choose the version that supports the riff, kick pattern and full arrangement. A visually neat waveform is useful evidence only when it explains a result you can hear.
5. Is It Cancellation, Masking or Dynamics?
Several different problems can make the kick seem smaller when the bass enters.
Cancellation occurs when overlapping signal components subtract. It depends on their amplitudes and phase relationships over time.
Masking is perceptual: one sound makes another harder to hear. A kick can remain present in the signal while its body or attack becomes difficult to identify behind the bass and guitars. Brian Cofer’s analysis of 30 professionally mixed rock songs examines frequency-dependent masking between stems, including bass and drums.
Dynamics processing adds another possibility. The bass may drive a shared compressor or limiter harder, reducing the impact of the kick even when no dramatic cancellation occurs.
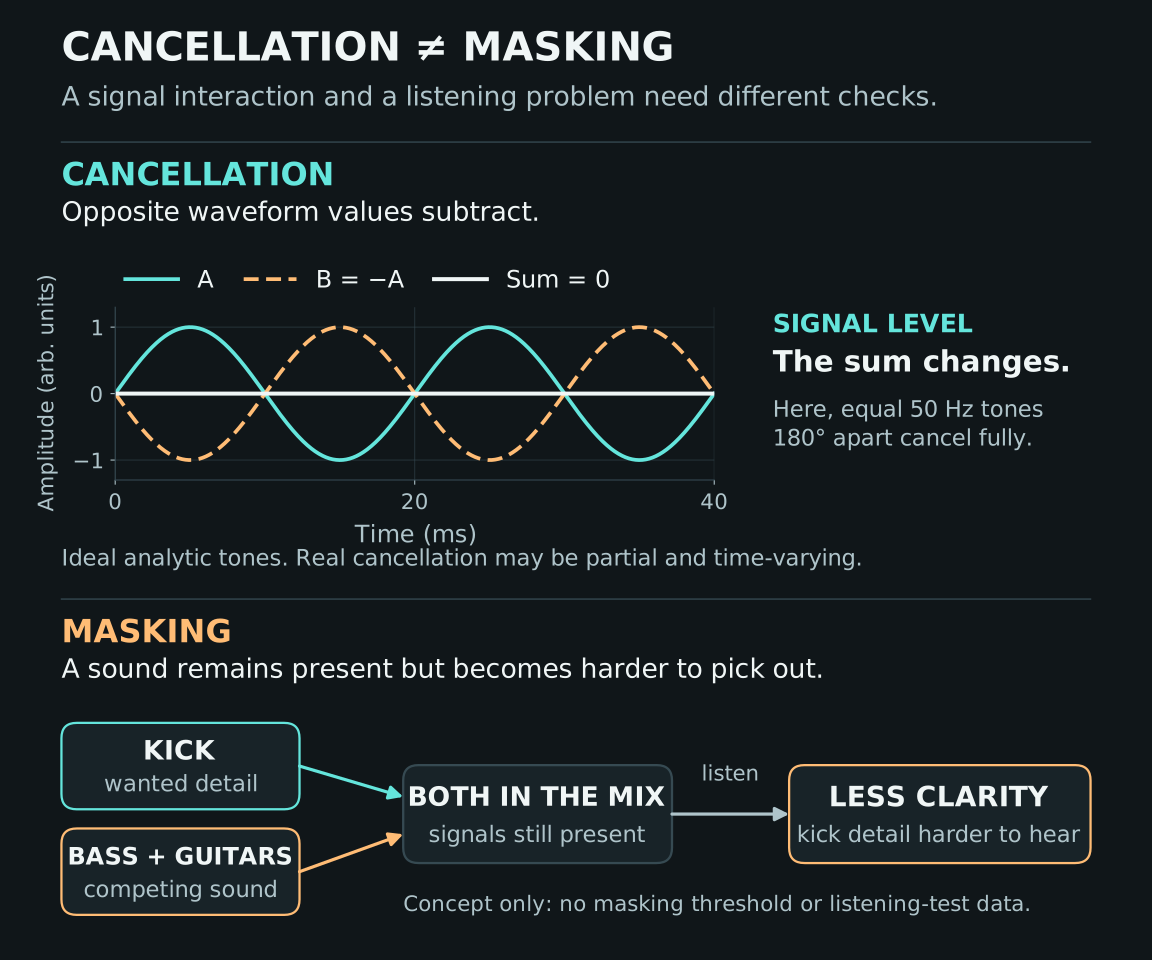
Cancellation changes the summed signal. Masking changes how easily a sound can be heard among other sounds. This conceptual comparison does not estimate an auditory masking threshold. Open the image for a larger view.
Use these listening clues to choose the next test:
| What you notice | What to check next |
|---|---|
| Particular notes or hits change strongly with polarity | Related-source alignment, then the combined signal across multiple notes |
| Kick body is audible alone but hard to follow in the mix | Level balance, spectral overlap and bass sustain |
| Kick loses impact only with mix-bus processing active | Gain reduction, input level, attack and release |
| The low end changes dramatically as you move your head | Monitoring position and room response |
These clues guide diagnosis. None proves a cause on its own.
Room acoustics can also disguise a mix problem. In a simulation study of 324 small rectangular rooms, Calderón De Palma and Masson found that different low-frequency metrics could rate the same response differently. Their study compared room responses; it did not test mixes or listeners. The authors called for listening tests and analysis across more source and receiver positions. For mixing, this supports a cautious approach: use a single score as a clue, then investigate what happens at your listening position before changing the track. Our studio acoustics guide explains how placement, reflections and room measurement fit into that check.
6. Build the Bass Tone Around Its Job
In a dense rock or metal mix, bass often needs to provide both weight and enough upper-frequency information to follow the riff. More sub-bass does not automatically improve either job.
Start with the part playing against the kick and rhythm guitars. Decide how much sustained weight the arrangement needs and how much pick, finger or distorted midrange should remain audible.
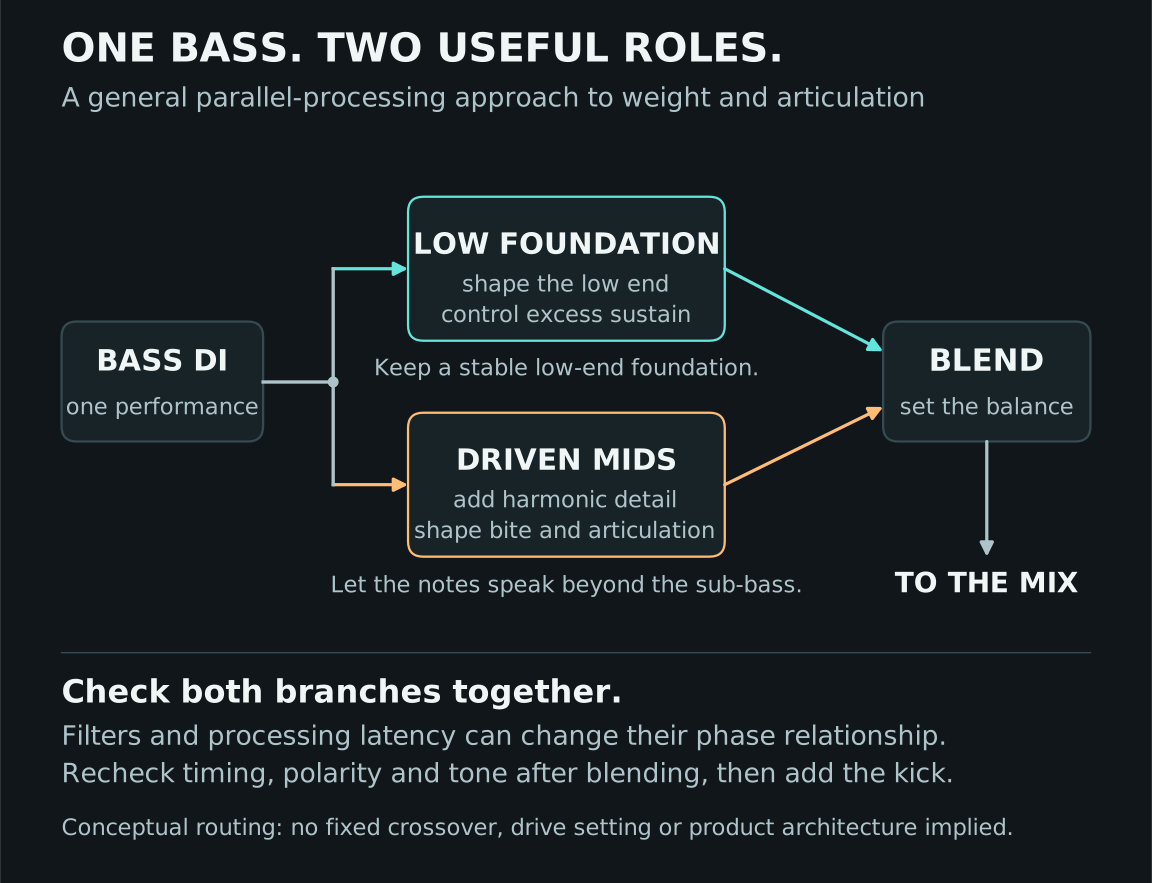
Shape weight and driven character separately, then judge the recombined bass against the kick. This is a general production approach, not a circuit diagram of a particular plugin. Open the image for a larger view.
Mammoth: Separate Weight from Distorted Character
The parallel architecture of Aurora DSP Mammoth makes it a useful bass distortion plugin for this approach. Its crossover, four amp models, EQ and blend controls let you shape the low foundation and driven character within one chain.
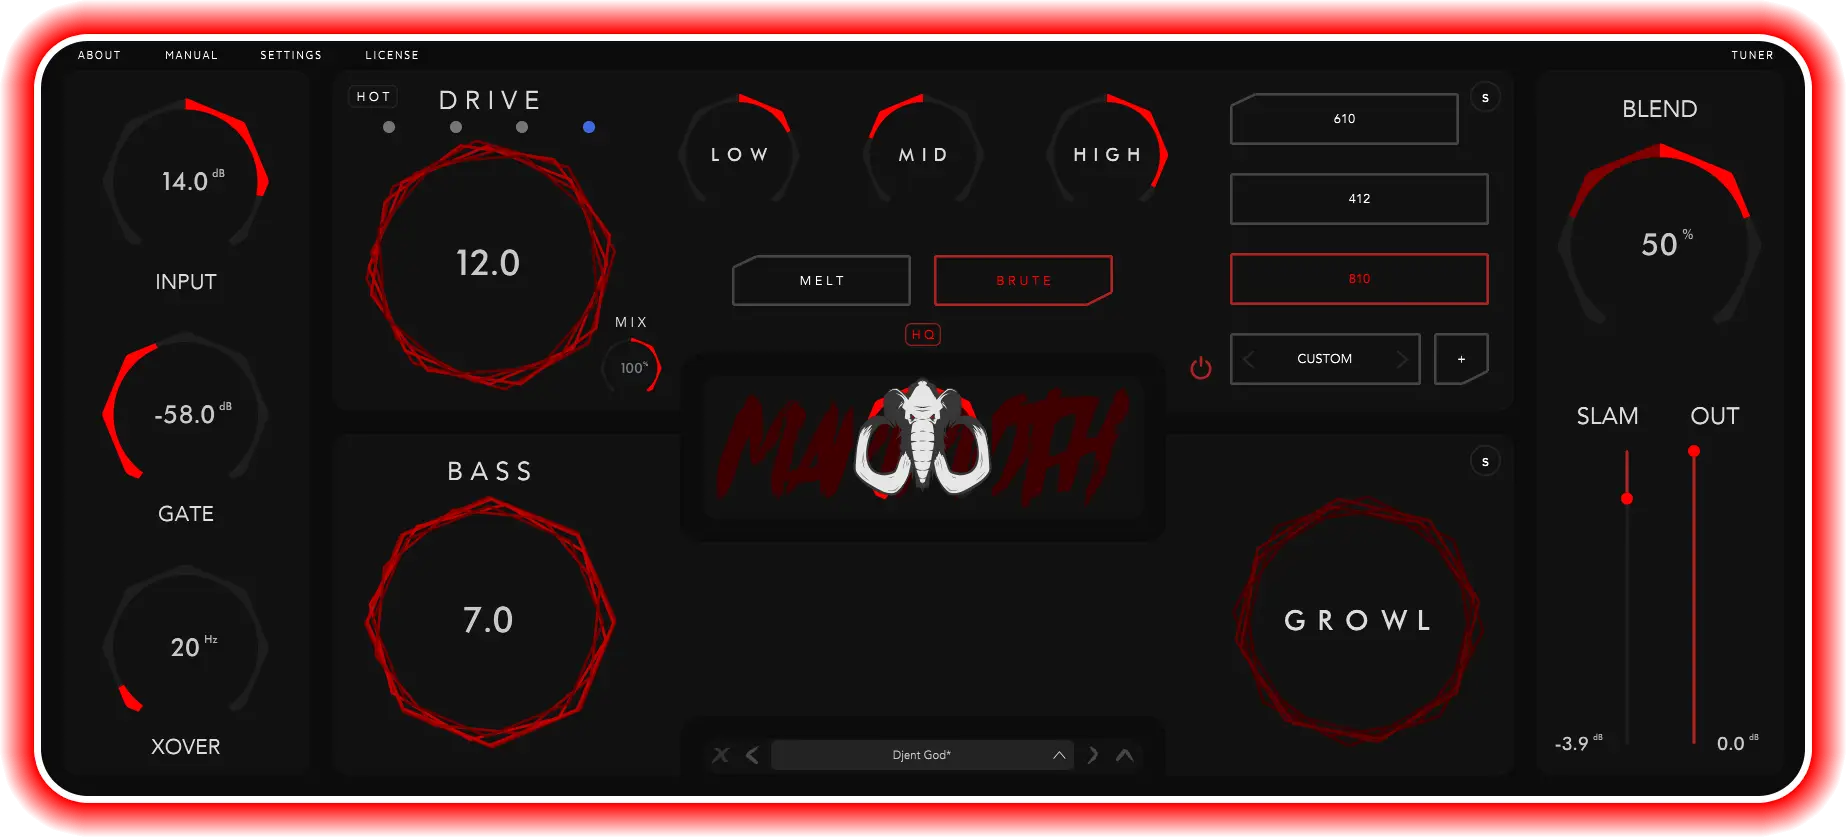
Mammoth brings the low foundation, drive and blend into one bass-processing interface. Official Aurora DSP product image; the displayed values are not a suggested preset. Open the image for a larger view.
Establish the foundation first. Add enough drive and midrange definition to follow the notes at a moderate playback level, then check how the kick comes through. Distortion can add useful harmonics, but excessive drive can also flatten articulation and crowd the guitars.
Match the output level when comparing tones. A louder bass preset can sound impressive while making the combined low end less controlled.
Gorilla: Control Uneven Notes by Frequency Range
If one low note blooms while the next feels restrained, Gorilla Bass Studio Suite offers three-band processing with independent compression and saturation, plus three preamp voices and an IR mixer.
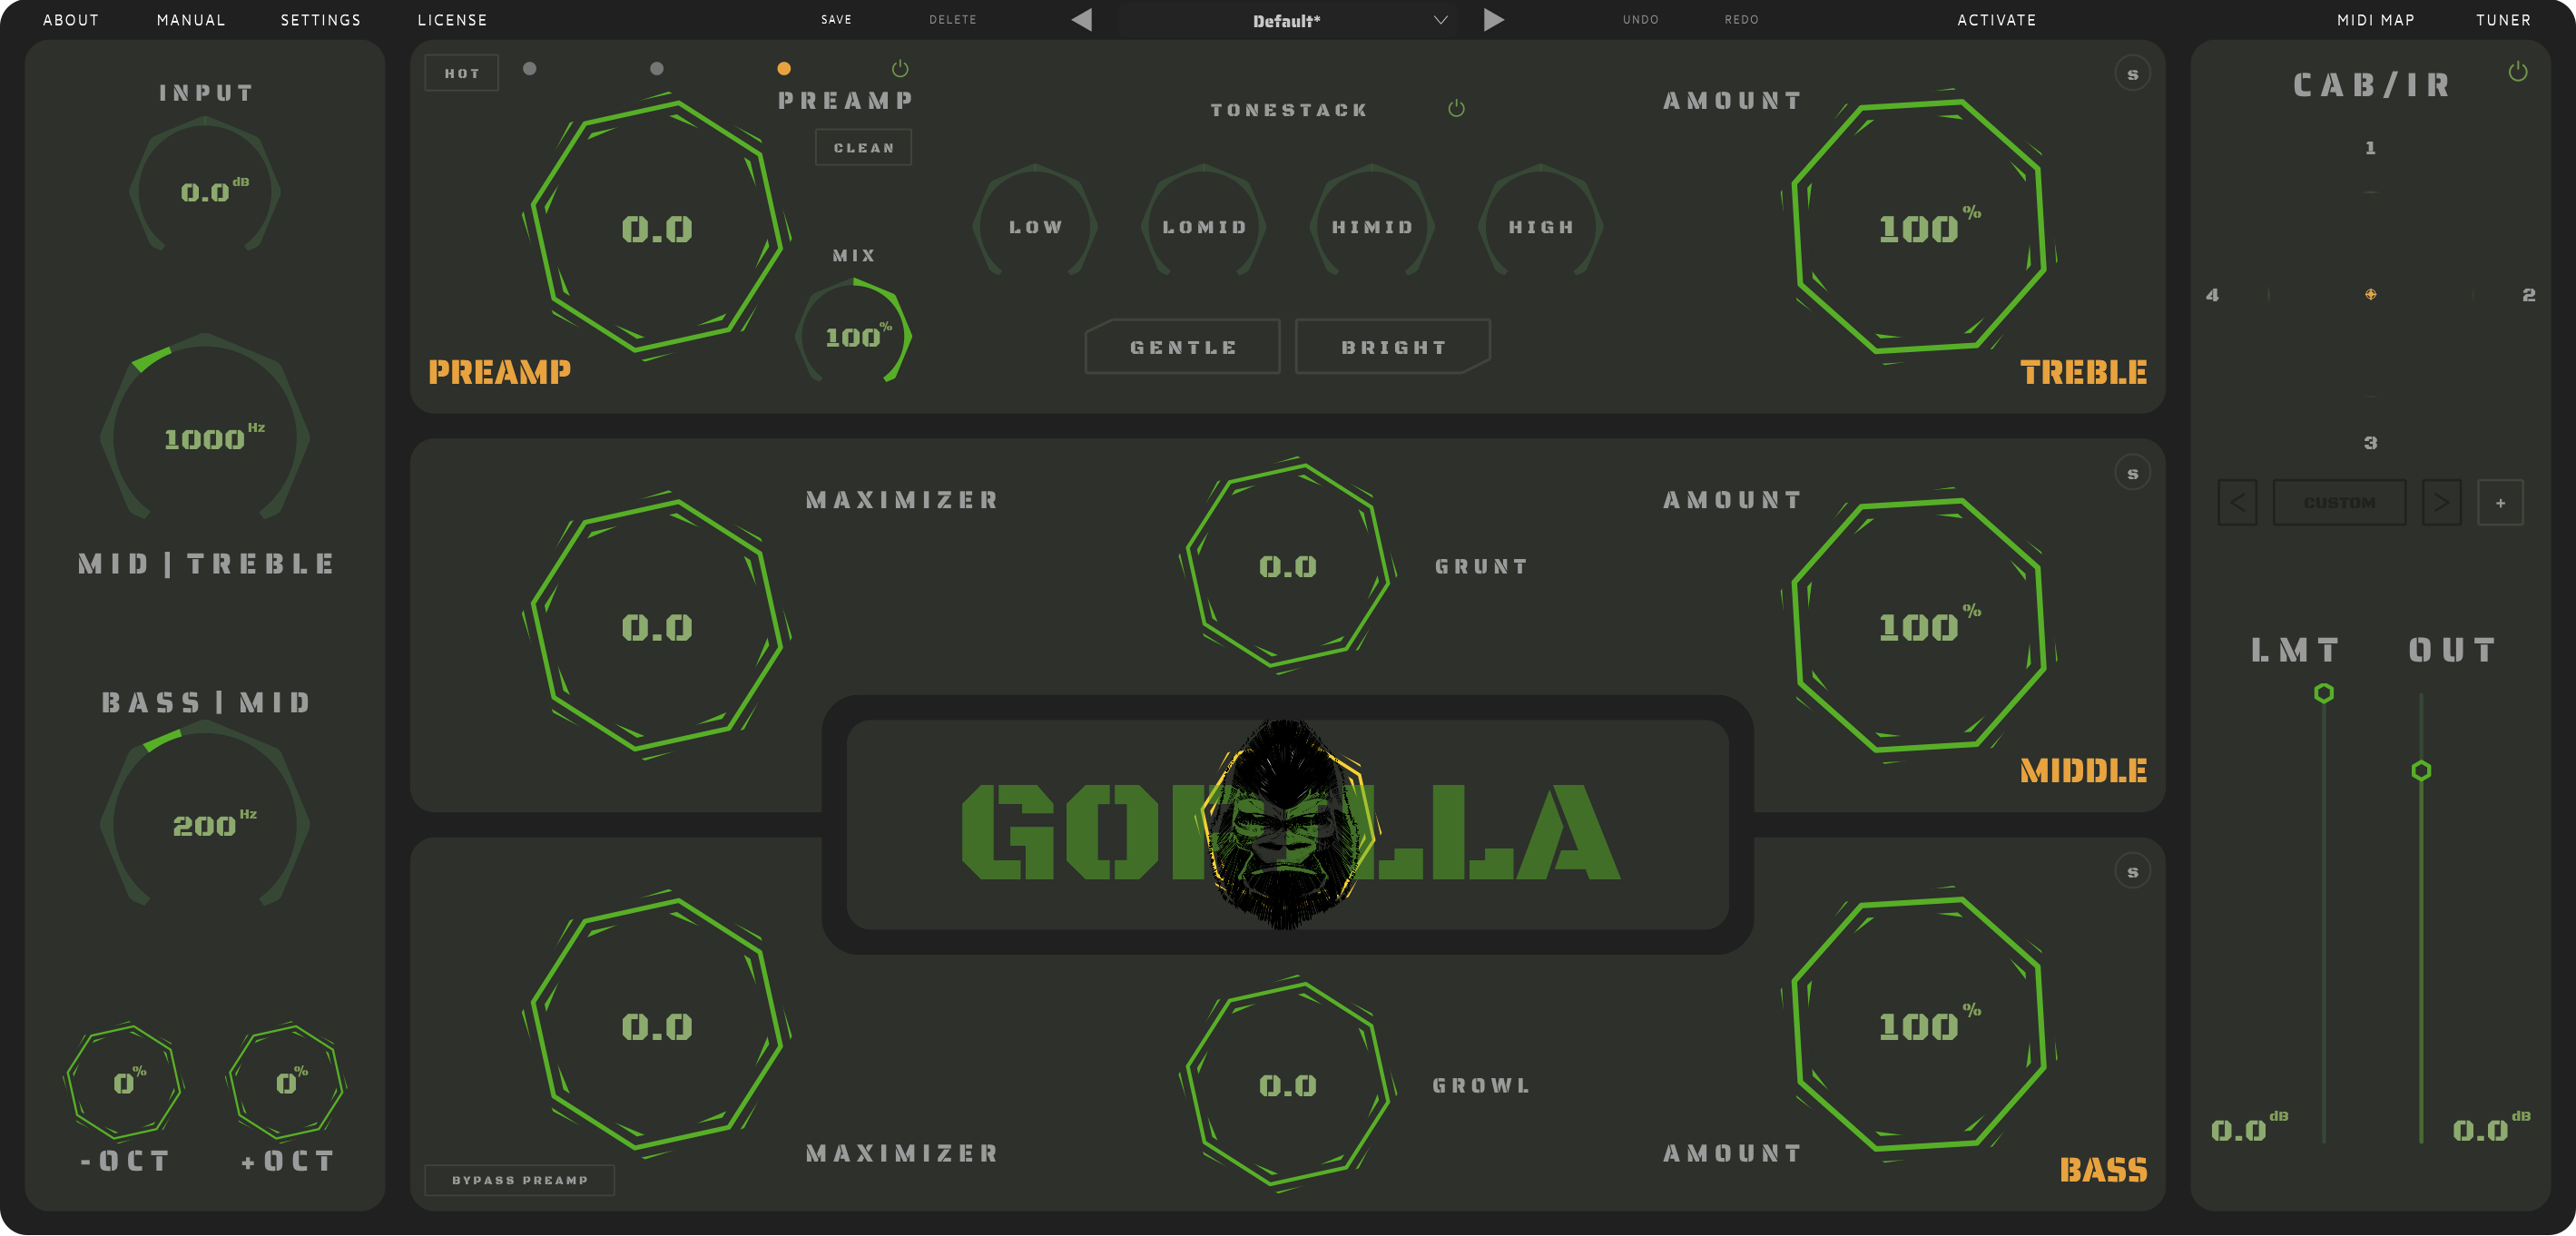
Gorilla presents bass, middle and treble processing within a shared signal chain. Official Aurora DSP product image. Open the image for a larger view.
That separation is useful when the bottom needs tighter control but the midrange still needs movement. Compress only as much as the performance requires. Recheck the complete phrase, especially transitions between open strings and fretted notes.
Multiband control can stabilize the bass. It does not automatically create space for the kick; you still need to listen to both together.
Laney Digbeth: Choose the Amp Character in Context
For a tone built around amplifier character, the Laney Digbeth bass amp plugin combines FET and tube preamp voices with parallel processing, cabinet shaping, EQ and dynamics.

The amplifier character behind the Laney Digbeth plugin. Official artwork from the Aurora DSP product page. Open the image for a larger view.
Choose the preamp blend and cabinet response while the arrangement plays. Listen for the point where the bass has a clear identity without dominating the kick’s body or fighting the guitars’ lower midrange. Revisit the low-end balance after changing the cabinet or drive amount.
These are alternative starting points. Pick the workflow that suits the recording, then make the kick and bass relationship work around it.
7. Make Space Where the Collision Happens
There is no universal rule that the kick owns 60 Hz and the bass owns 100 Hz. The useful balance depends on the kick sound, bass tuning, note choices and arrangement.
Loop a representative section and listen to the kick’s body and the bass fundamentals. Try a small, broad EQ adjustment where they compete. Then move to a different section. An EQ choice that works on one sustained note may leave another too thin.
Use static EQ when the imbalance is persistent. Use dynamic EQ or frequency-selective ducking when the conflict mainly happens at each kick hit. A separate processor with an external sidechain can briefly reduce the conflicting part of the bass spectrum while leaving more of its upper articulation intact.
As an experiment, try roughly 1–3 dB of reduction in the problem band. Adjust the timing until the kick becomes easier to hear and the bass recovers naturally between hits. The appropriate range and release come from the performance; these numbers are a starting point, not a preset.
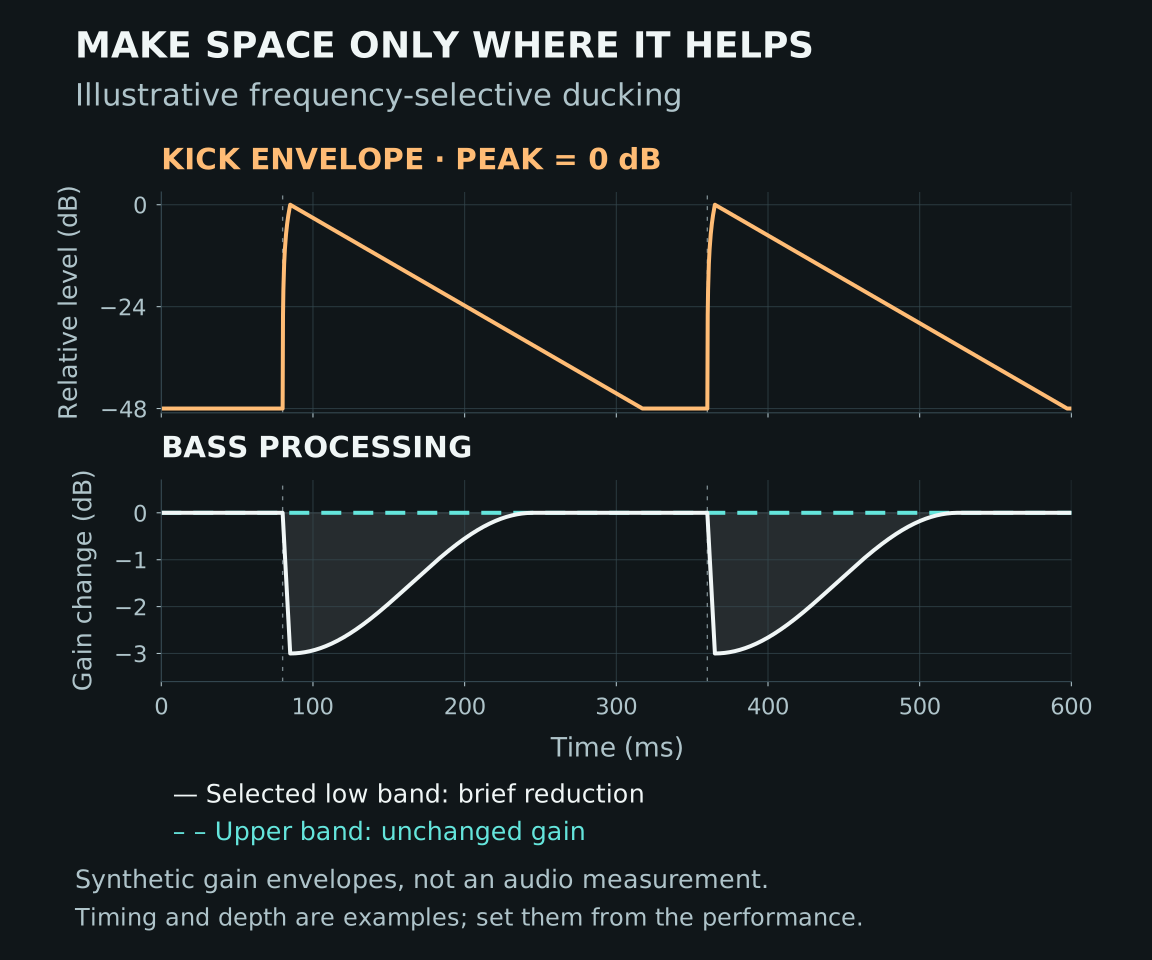
Frequency-selective ducking briefly lowers the conflicting bass band. This calculated gain-envelope example illustrates the idea; timing and reduction must be chosen for the actual performance. Open the image for a larger view.
Full-band sidechain compression can be right when the entire bass should step back rhythmically. For fast double-kick passages, listen for sustained gain reduction that prevents the bass from recovering.
Also check note length. Shortening an overlong kick tail or editing an unintended bass overlap may create space more naturally than another processor. If you can change the kick source, audition candidates against the bass at similar levels. Compare their attack and decay through the busiest riff before reaching for EQ.
8. Low End Costs Headroom and Excursion
Boosting low frequencies can reduce available signal headroom and demand more loudspeaker displacement. The exact relationship depends on frequency, driver and enclosure. Klippel’s loudspeaker simulations illustrate how low-frequency boosting changes excursion, voltage and power demands.
Keep three limits separate: digital peak level, gain reduction in your processing, and the physical output capability of the monitoring system.
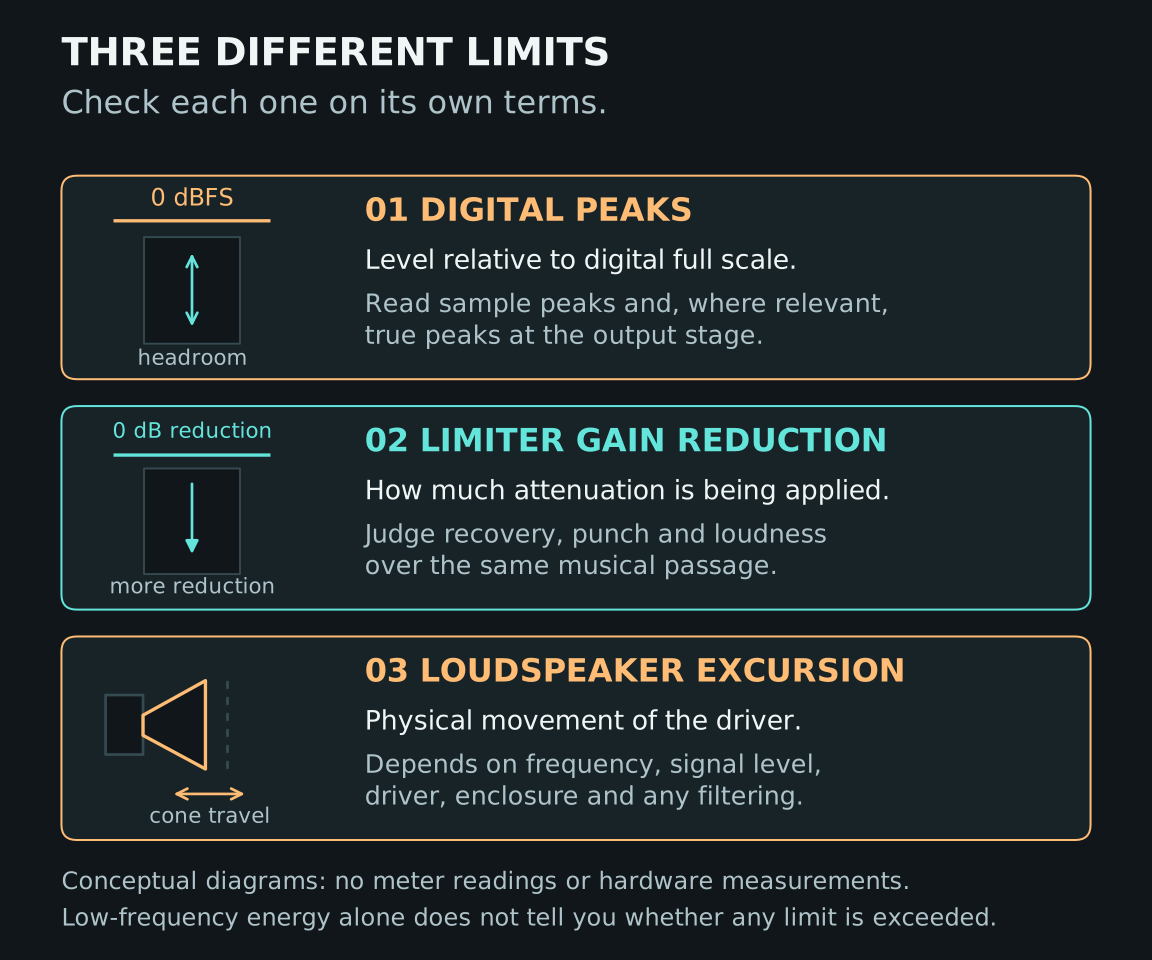
Digital peaks, limiter behavior and speaker movement describe different limits. A change on one meter does not, by itself, explain what the other two are doing. Open the image for a larger view.
Inspect the kick-and-bass bus before the limiter. Watch its peaks and average level over the same musical passage. Then listen through the full mix chain. Extra low end that repeatedly drives the limiter harder may give you less apparent punch at the final output.
Remove rumble when it serves no musical purpose, but choose any high-pass filter with the instrument’s lowest notes in mind. A low B on a five-string bass is approximately 30.9 Hz. A steep 40 Hz high-pass filter can therefore alter part of the intended foundation.
For extended-range parts, Absylon Bass is Aurora DSP’s bass plugin aimed at five- and six-string, extended-scale and multiscale instruments. Even with a purpose-built tone, judge the deepest notes alongside their harmonics and the kick. Small speakers may reveal the note through those harmonics while reproducing little of its fundamental.
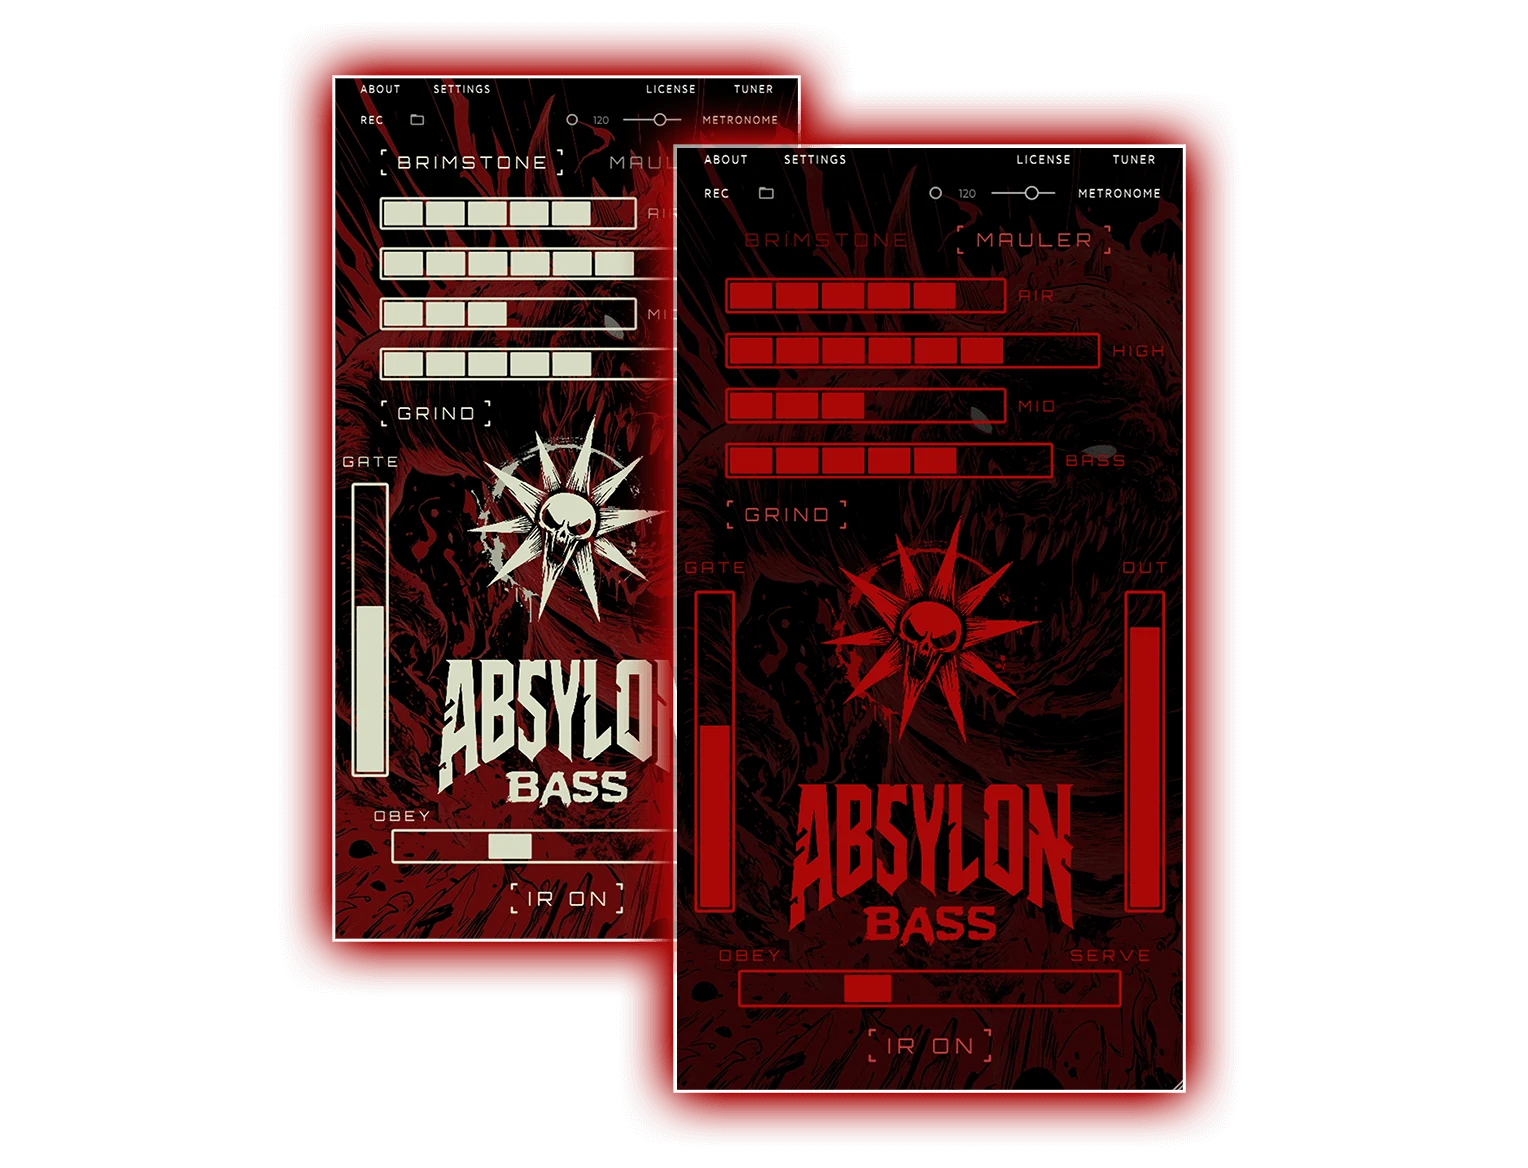
Absylon Bass is aimed at extended-range instruments. Keep the musical role of the lowest notes in mind when balancing the kick and choosing filters. Official Aurora DSP product image. Open the image for a larger view.
9. A Repeatable Kick and Bass Mixing Check
Use one short loop for diagnosis, then verify every decision across the song.
- Balance the arrangement. Set kick and bass levels with the rhythm guitars present. Check whether the performance, note lengths and kick tail already explain the overlap.
- Check related signal paths. Compare DI and amp, multiple microphones and parallel returns for timing and polarity problems. Verify delay compensation before adding manual offsets.
- Compare the sum. Listen to kick alone, bass alone and both together. Try bass polarity inversion, then audition several notes and sections before keeping it.
- Shape the bass identity. Choose your amp, distortion and cabinet sound. Establish weight and articulation, then compensate for output-level changes.
- Treat the actual conflict. Use level, envelope edits, EQ or sidechain processing according to what you hear. Change one thing at a time.
- Check the output. Compare bus peaks, average level and limiter behavior. Use the same measurement window; crest factor describes peak-to-RMS ratio, not musical quality.
- Verify translation. Listen in mono, on headphones and on smaller speakers. Return to the complete mix at a moderate level before committing.
Before adding another processor, try three focused checks drawn from established mixing practice:
- Mute both low-end instruments. With kick and bass silent, listen for competing weight in guitars, keyboards and effect returns. Remove unwanted rumble selectively, then bring the rhythm section back. Owsinski discusses this audit in The Mixing Engineer’s Handbook, chapter 7.
- Inspect individual bass notes. If a few notes leap out or disappear, try modest clip-gain edits before compression. Preserve intended accents and sustained phrasing, and recheck any amp or distortion stage whose response changes with input level. Marc Mozart discusses preparing levels before processing in Your Mix Sucks, chapter 7.
- Use a reference outside your mix processing. Loop a comparable passage from a familiar track, match playback loudness, and compare kick prominence, bass sustain and note definition. Route it so your mix-bus processing does not alter the reference. Mozart covers reference routing and level matching in chapter 3.
If the bass loses weight in mono, bypass widening, chorus and parallel effects one at a time to locate the stage responsible.
For technical diagnosis, keep source gains fixed so you can observe how the sum changes. For a tone preference comparison, also match perceived loudness so the louder option does not win by default.
If you save measurements, label the passage, processing state and measurement method. A useful test is repeatable. It does not need to produce a flattering graph.
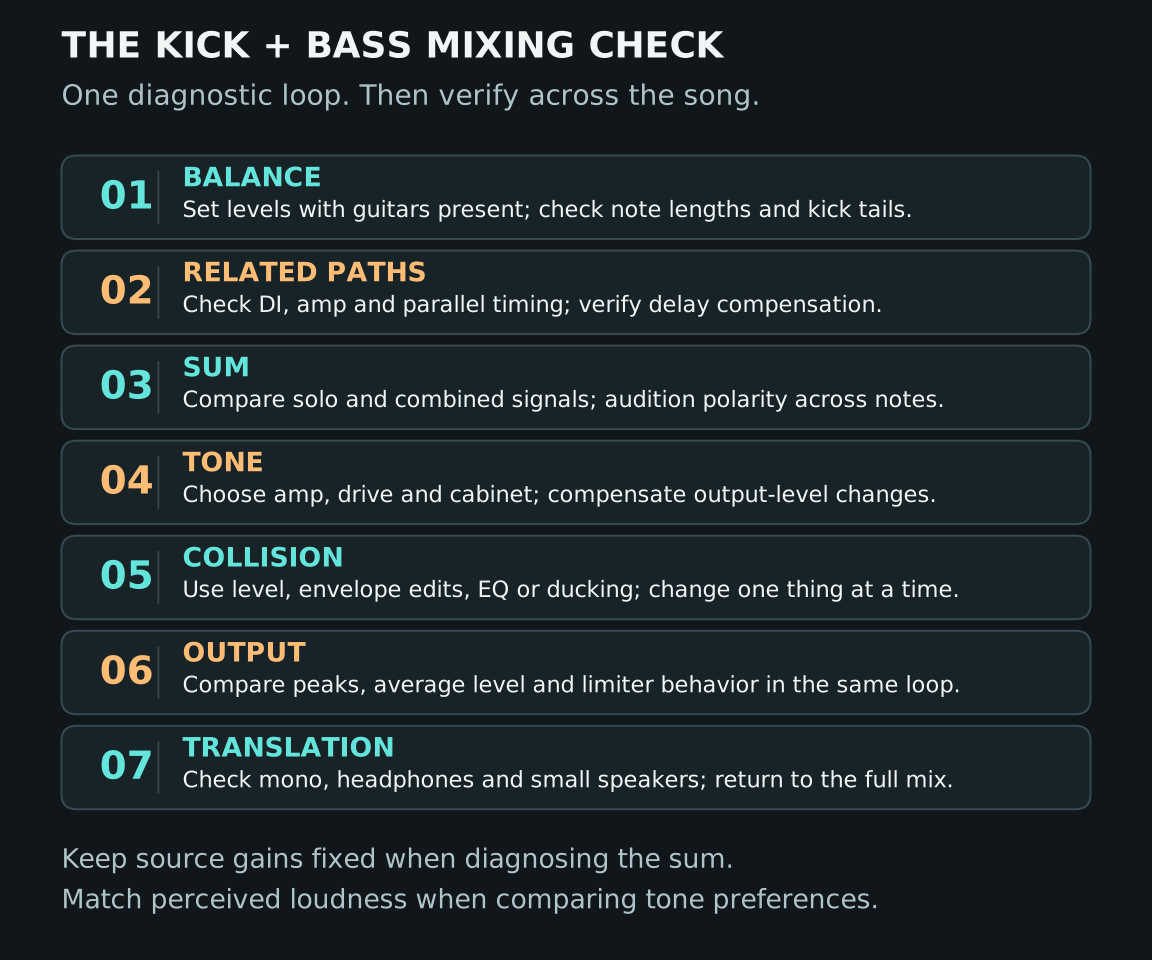
A repeatable route through the session. After a useful change, listen across several notes and sections before committing. Open the image for a larger view.
10. Let the Whole Mix Decide
The strongest kick-and-bass combination may sound surprisingly restrained in isolation. Once the guitars and vocals return, the low end has a clear pulse, the notes stay readable, and the mix bus has room to breathe.
That is the result to chase.
Listen to the relationship. Use the waveform to investigate it. Shape the tone, timing and dynamics until both instruments support the song.
Two tracks in the session. One combined signal at each output. One low end to get right.
Looking for a starting point for your bass chain? Explore the Aurora DSP Ultimate Bass Pack, which brings together Mammoth, Gorilla, Laney Digbeth and Absylon Bass.
Kick and Bass Mixing FAQ
Should I always invert the polarity of the bass?
No. Compare both settings over several notes and song sections. Polarity inversion changes the sign of the entire signal and may improve some moments while weakening others. Check related recordings of the same source first, then judge kick against bass in context.
Should the kick and bass be perfectly phase-aligned?
There is no single alignment that keeps every frequency and note in a fixed relationship. Kick and bass change over time. A time shift can alter both their interaction and the groove, so evaluate the musical result across the part.
What frequencies should I cut to separate kick and bass?
Find the overlap in your actual sounds. There is no fixed kick frequency or bass frequency that works for every tuning and arrangement. Use a small static cut for a persistent imbalance, or dynamic processing when the conflict happens mainly on kick hits.
Can bass distortion make a metal mix clearer?
Yes, adding harmonics can make the bass line easier to follow without relying only on deep low-frequency energy. Parallel processing, such as Mammoth’s bass workflow, lets you shape the foundation and driven character separately. Too much distortion can still obscure articulation and compete with guitars.
Do I need sidechain compression on bass?
Only if it helps the arrangement. Correct level balance, note lengths and tone may be enough. Frequency-selective ducking is useful for a localized collision; full-band ducking suits a broader rhythmic reduction. Use a processor that supports the sidechain routing you need.
Sources and Further Reading
- Daniel A. Russell, Penn State: Superposition of Waves.
- John Stuart Murray, University of York, 2022: Towards Real-Time Non-Stationary Sinusoidal Modelling of Kick and Bass Sounds for Audio Analysis and Modification.
- M. V. Laitinen, K. Jussila and V. Pulkki, 2014: Effect of Phase on the Perceived Level of Bass.
- Brian H. Cofer, Belmont University, 2019: An Analysis of Perceptual Masking between Stems in Manually-Mixed Multitrack Audio using a Cross-Analytic Loudness Model.
- Jorge Ignacio Calderón De Palma and Florent Noel Masson, ICSV24, 2017: Assessment of Low Frequency Quality Metrics in Small Rooms (author-posted copy).
- Klippel: Linear Parameter Measurement and Linear Simulation and Auralization.
- Bobby Owsinski: The Mixing Engineer’s Handbook, 3rd edition, chapter 7 (low-end audit).
- Marc Mozart: Your Mix Sucks, chapters 3 and 7 (reference tracks and level preparation).
- Practical editorial comparisons: Mastering The Mix’s kick and bass guide and the Gearnews kick and bass workshop. Their fixed settings are not treated as universal rules.
The sine-wave figures show calculated examples. The mixing workflow is practical editorial guidance; no original Aurora DSP listening study or hardware measurement is claimed.